Today we’ve put together an Infographic detailing the 20 Steps to Success Selling Physical Products on Amazon using ‘FBA’ (fulfilled by Amazon), as well as the Definitive Guide To Selling On Amazon.
The 20-Step Amazon Success Blueprint
Click the image below to enlarge it.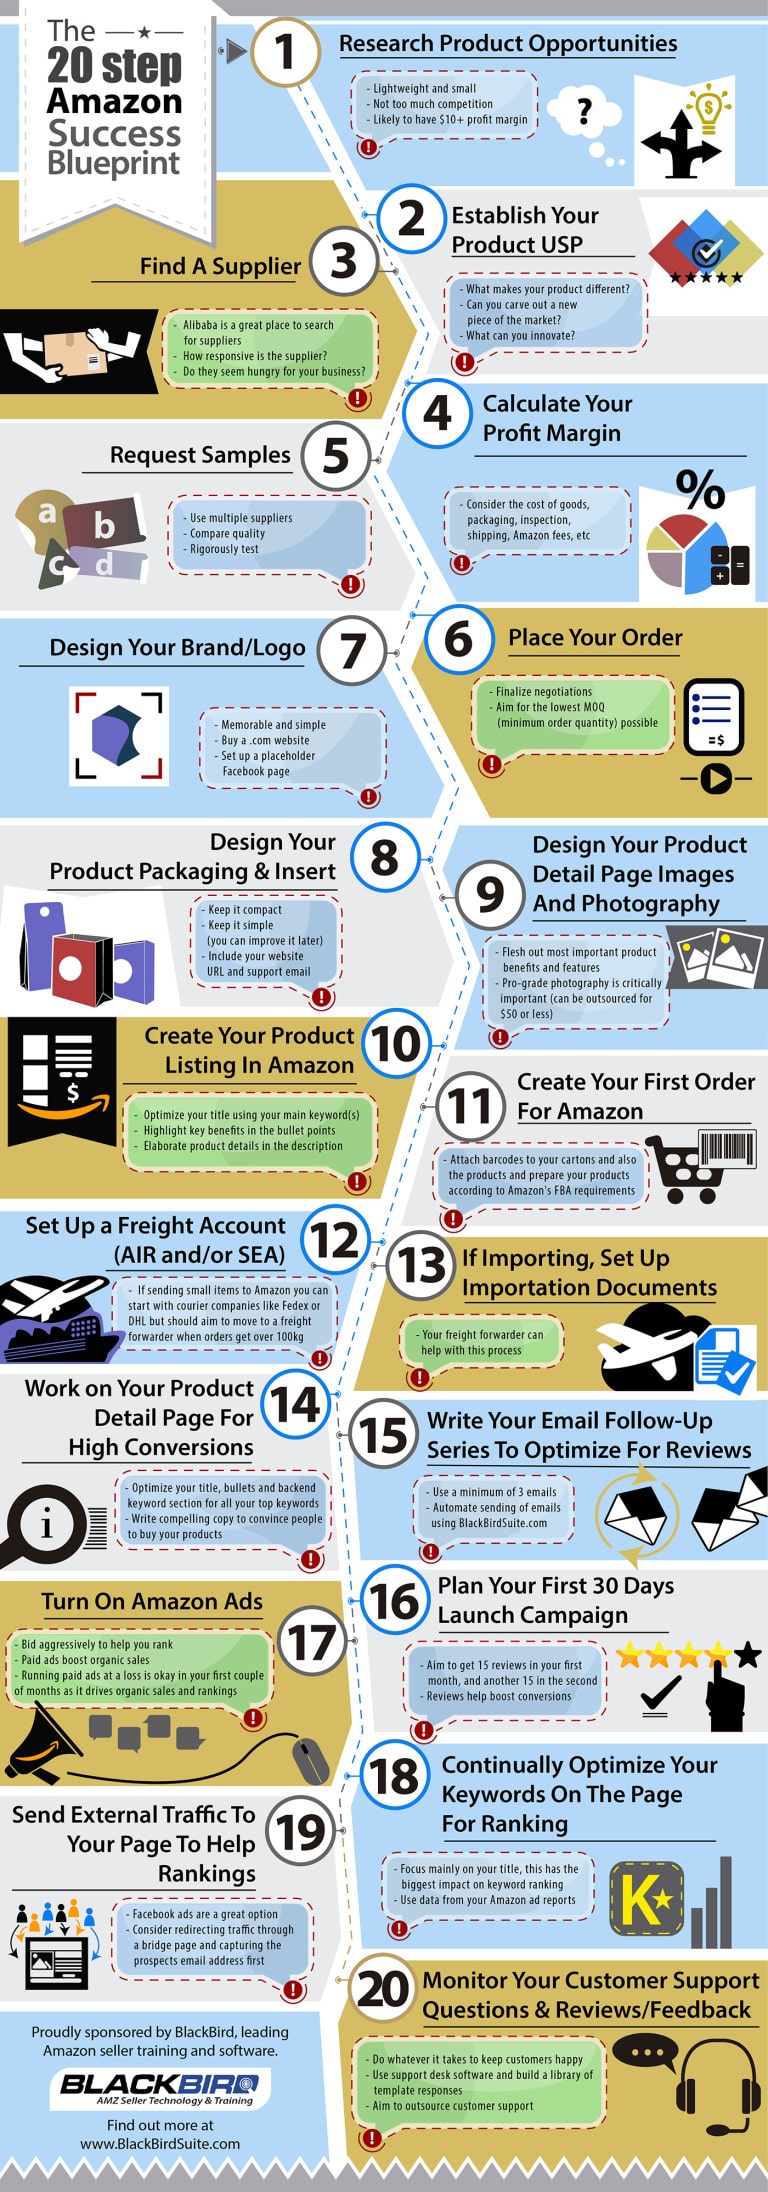
1. Research Product Opportunities
When thinking of what to sell online, it’s best to look for smaller, lightweight products that are easy to sell and ship.
Start by going to Amazon and clicking the down arrow under ‘All’ in the search box.
You will see a list of categories.
Choose one that appeals to you and look within that category.
Bestsellers and popular products will show up on the category home page.
If you keep drilling down into sub-categories, you will see the bestsellers listed for each section.
Click on a few products in the top 5 and scroll down to Product Information.
You will see a number called “Best Sellers Rank” (BSR).
This is the overall ranking of that item in the main category (i.e. ‘Home & Kitchen’).
If the first few bestsellers in your sub-category are all below 10,000, it’s a good indicator that these products sell several per day.
Look at your competition as well.
If there are several similar products at the top that have over 300 reviews, it may be hard to compete.
However, if many have 200 or fewer reviews, there is good potential for you to squeeze in among the top in short order.
You’ll also want to find a good product that will give you a decent profit margin, such as $10 or more.
If you see an item on Amazon selling for $29.95, you’ll want to make sure that your total costs to produce and ship are less than $20.
Don’t forget Amazon’s cut as well!
TIP: We like to be able to triple the cost price of an item.
For example, if we can source an iPhone case for $5, we want to be able to sell it for $15.
If we can source a magnetic photo frame for $10, we hope to sell it for $30 or more.
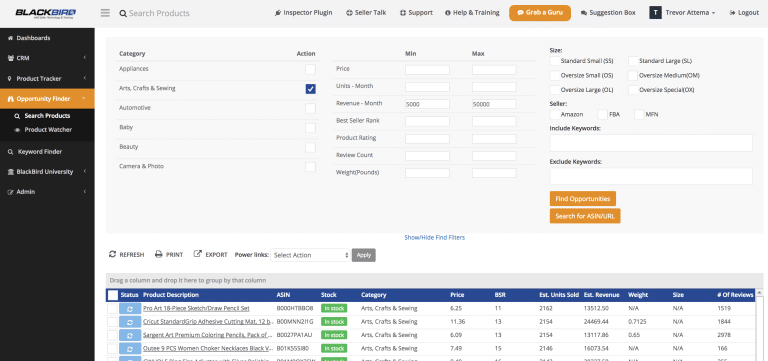
TIP #2: The product research step can be accelerated using BlackBird.
The screenshot below shows how you can filter out thousands of products in the ‘Arts, Crafts & Sewing’ category in a matter of seconds.
Not only that, but you can see the estimated monthly sales volume (click the image below to enlarge it)!
2. Establishing Your Product USP
Now that you have found a potential product to sell, research all your main competitors.
Better yet, look at their negative reviews!
By reading all the negatives about a product, you have an opportunity to find a way to solve the problem buyers are having.
What can you do to make your product stand out from the competition?
 Think of reasons why a customer would choose your product over that of others.
Is it better quality? Does it have a special feature that no other product has?
Does it solve a problem that is common to other products in an innovative way?
To cite a real-world example, there are dozens of models of garlic presses selling on Amazon.
Most look the exact same (go ahead, take a look!).
When viewing negative reviews, you may find a few complaints about it being hard to clean.
How can you solve this problem?
By adding a special tab with tiny hard rubber needles that exactly match the holes.
This pushes all garlic pieces out of the unit, making it easier to clean.
You have now just differentiated yourself with a built-in “cleaning system” for your product!
When you go to look for a supplier, talk about customizing the product.
Most will be happy to do everything they can for you.
The per-unit cost may increase, but this will justify positioning your product as premium and with a premium price tag to match.
3. Find a Supplier
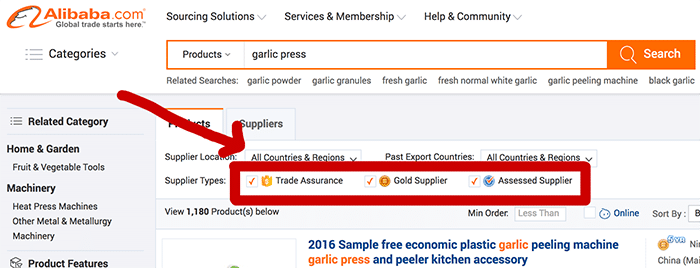
Alibaba is a great place to search for suppliers.
There are thousands of manufacturers waiting for your order, though there are a few things to keep in mind, as not all suppliers are created equal.
First, there are special filters to weed out lower-quality suppliers in the search bar.
You’ll want to make sure they are:
Gold Supplier – these companies pay for their listing, so they likely won’t be “fly by night” companies.
Assessed Supplier – A 3rd party assessor has toured the factory premises to make sure they really are who they say they are. An official document will be available.
Trade Assurance – If you send the supplier money, and they do not deliver, Alibaba will refund you up to the coverage available. If the coverage offered if high, this usually means they are to be trusted and are in good standing.
Create a list of possible choices, and email them one by one.
Note when you receive a response, as their level of communication and commitment to customers is definitely something to consider as well.
Just as you want to make sure you are dealing with a reputable company, the supplier will also want to make sure they are dealing with a reputable buyer!
When you initially contact a supplier, use a professional but personalized approach.
Do your research and find the contact name, and talk about something unique about their company, which you can find in their ‘About Us’.
Show that you have researched them and you are serious about doing business.
4. Calculate Your Profit Margin
While many suppliers show their prices on Alibaba, everything is negotiable.
However, the price of the product is only one factor in the profit equation. Think about the following when planning your product:
- The initial cost of the item (cost of goods)
- A one-time “moulding fee” if you are creating customizations
- Packaging and inserts
- Shipping
- Customs and brokerage fees
- Inspection of your goods
- Amazon labelling
- Amazon warehouse fees
- Amazon commission when sold through their website (15%)
- Amazon packing and weight handling fees
While all these costs may seem overwhelming, many of these costs only add up to a few pennies or a dollar if divided by your entire order.
Often the biggest cost will be Amazon itself.
You can still make a great profit, especially if you position your product as a premium.
5. Request Samples
Once you establish good communication with a supplier and go over details of any customizations, you will, of course, need to actually see the finished product.
Don’t ask for this in the first email, do it in the second or third, proving you are not just “some guy” asking for a free product.
You may receive the product for free, you may be charged, or you may be charged but have it deducted from your order.
In our experience, we are usually only charged for shipping.
Ask if they can ship on their account, as shipping from China is very inexpensive.
They will usually request payment via Paypal or Alipay before they ship.
Optionally, ask for a few samples.
Most companies will send you their best example of the product, so by having more than one, you can compare slight variations to assess the quality.
When requesting samples, be as detailed as possible.
If the item is made from nylon, ask if it’s 400D or 600D (even if you know the answer).
This shows that you have done the research and you are a serious buyer.
Once you receive your sample, rigorously test it. See how far you can use it before it breaks.
If it’s a garlic press, stuff several pieces in to see how it still works.
Throw it on the floor and wash it several times to test the wear and tear.
You will be positioning your product as premium … make sure it is!
6. Place Your Order
Once you are satisfied with the sample and any customizations, it’s time to place your order.
Negotiate the smallest possible MOQ (minimum order quantity) by stressing that you wish to first have an initial test run to make sure the product sells and is profitable.
Only negotiate MOQs when you are late into negotiations.
Suppliers who have spent a lot of energy and time helping you out will likely be much more receptive to lower-order quantities, especially if you give them the promise (however vague) of large future orders.
If you have done all your research properly, this is one promise you can definitely keep!
Cost per unit will always be higher with smaller orders.
Don’t haggle too much over price if they are already willing to do smaller orders unless there is a large discrepancy between their quote and the usual cost of their posted MOQ.
7. Design Your Brand/Logo
When designing your brand and logo, think about who your typical customer is.
Now, think of who your premium customer is.
What’s the difference?
You want your product to appeal to someone who is willing to pay more for your product. You want them to feel good about their purchase and, more importantly, rave about their purchase to their friends!
Think of it this way.
Would you brag to your friends about the no-name brand barbecue you bought at Walmart, or the ultra-premium, high-quality stainless steel “Professional Series” barbecue with infrared?
Of course, it would be a premium product.
Their friends will get envious and go out to buy that barbecue from the same company (probably a model even more expensive!)
The point is, you don’t want to appeal to the lowest common denominator.
You want to position yourself as a premium brand with exceptional customer service.
When designing your logo, make sure it denotes that premium experience.
Spend the extra money at 99 Designs to hire a professional designer to create your logo.
For your name, think of something memorable, simple and brandable.
“Workout Yoga Wear” is not a good name. It sounds too plain and is easily forgettable.
Compare that to “Athleta”, which is memorable and conjures up images of athletes and fitness. Or “Sweaty Betty”, which is whimsical and definitely memorable (but maybe not “premium” sounding!)
When thinking of a brand, also think of the website address. Always try to register a .com domain name.
If your name is not available, put the word “store” or “shop” at the end. If your name is already registered, make sure it is not of a similar product or is an undesirable website. Potential customers may look for you by simply typing in what they think is your domain name based on your brand name!
8. Design Your Product Packaging & Insert
Your product packaging is an offshoot of your brand name.
If you are positioning yourself as a premium brand, make sure your packaging is also high quality.
When you deliver your product in exceptional packaging, you are telling your customer that your product is worth paying more for.
High-quality packaging doesn’t mean it has to be complicated.
You also have to think about shipping, so keep it compact as well.
Think of an iPhone case.
Though the product denotes the quality, it comes in a simple box.
However, that box is high quality!
Ask the supplier for the specifications and template of their packaging for your product.
Hire a professional designer on 99 Designs (or similar) to create the packaging, and give them the supplier-produced template to work with.
On your packaging, make sure you include your website info and support email.
Along with the packaging, always create and include a marketing insert.
Here’s an example of a post-card sized product insert card:
And here’s the back side of it:

These can be used to drive your buyers to a page where they can be added to your marketing list.
The marketing insert could be a simple thank you with the opportunity to join your list to receive a discount coupon or a free ebook.
You could also offer an “extended warranty” by registering their product.
The address you will send them to will include an email form specifically for these customers.
This is so you know that this “VIP” list is made up of customers who have bought your product.
These are the most valuable customers you can ever have because they have proven to you that they know and trust your brand.
You can further build relationships and market new products to them for years to come!
9. Design Your Product Detail Page Images and Photography
The photos of your product will make or break a sale.
First impressions are crucial on Amazon.
Because of this, take time to devote resources to hiring a professional photographer.
Amazon asks that images be at least 1000 pixels in length on the longest side, but we usually upload 3000 pixels images.
Give the viewer as much detail as possible.
Ask your supplier for a final sample with your logo before you begin full-scale production.
That way you will have your actual product to photograph.
Think about how the customer will be using it, and what features they will be looking for.
Now is the time to illustrate why your product is better than that of your competitors. If you customized it, show that off in detail!
When reviewing your images, make sure nothing is confusing about them. Are there any props that a customer would mistakenly think are included with your product?
If you are showing two, are you actually selling two?
We came across a great product but with a very misleading image.
The seller showed three products, in three different colours.
In fact, the buyer only receives one, in a random colour.
The confusion about the image resulted in a massive number of negative reviews.
10. Create Your Product Listing on Amazon
Amazon’s product listing consists of four main areas:
Your images: This is the most important element.
Viewers will only spend a few seconds glancing at your product, so you need to catch their eye with a compelling main image.
Make sure it is sharp, detailed, and on a white background.
Your title: Make sure your main keywords are in your title.
This not only helps with search optimization, but it makes it clear to the visitor what it is.
You can add your brand name at the beginning if you wish, but make sure the first 35 characters will describe what the product is.
In Amazon advertising, your title will be cut off after around 35 characters.
Bullet Points: This is where you sell your product.
You have a maximum of five points, so use them well!
You may want to hire a good copywriter for this.
List your key features in a “fast fact” format, because your visitor will be skimming your product page, glancing at any key benefits that stand out.
This is where you point out the uniqueness of your product and how it will help the customer.
Description: This is usually below the fold …
However, it is still vitally important, because a certain percentage of buyers are also researchers … they want to read detailed info on a product before buying.
If you haven’t convinced them with your images, title or bullet points, this is where they will finally decide to buy.
You can only use bold formatting in your text here but don’t overdo it.
You don’t want to oversell them, either.
A professional, polished balance starts with a bold sentence that introduces the product.
Next, discuss what it does and how it will benefit the buyer.
List the features and benefits in point form, and finally, end with a Call to Action, usually something along the lines of Click on the “Add to Cart” button at the top to experience our product!
11. Create Your First Order For Amazon (and sort out barcodes)
All unique products need a UPC or EAN barcode.
To apply for one, you will need to register for a GS1 Company Prefix, which can be obtained from an official GS1 company.
However, an alternative is to apply for Amazon’s Brand Registry.
They will then give you a unique identifier, which you can use in place of a GS1 barcode.
If using FBA (Fulfillment by Amazon), this means you are letting Amazon store, process and ship your items out for you.
They have their barcode system for this, called an FNSKU (generated from your UPC, EAN or Brand Registry number).
One is created when you first create your product listing.
There will be an option to print your item label, which you can save as a PDF.
What you can do is send this item label to the graphic designer who is designing your packaging.
Have them integrate this special barcode into your packaging.
Otherwise, you can have your inspection agency or Amazon itself label all your products for a fee.
12. Set Up a Freight Account (Air and/or Sea)
Your product is now ready to ship from the supplier! Now what? You will need to find a way to ship it to Amazon.
The easiest way to do this is to have your supplier set up freight shipping for you.
Most will have no problem doing so.
However, there are many freight companies (also called freight forwarders) who will assist you in the entire process from shipping to the warehouse.
This is also called a “door-to-door” service.
You can also have your supplier ship out your products, and have the freight forwarder take over once it arrives at port.
Whatever you decide, you will need to know a little bit of lingo.
The Consignee is yourself and your business address.
The ‘In Care of’ Party is the destination once it reaches the shore, such as an inspection warehouse. The ‘Notify’ Party is your freight forwarder.
Your supplier will also ask about your “shipping mark”.
This is the information that will go on your boxes.
Give your supplier the name of your brand, your product name, and any sort of model number or identifier, which can be the UPC, Amazon FNSKU and even an imaginary number (remember to record it for your reference)!
Sea freight is cheaper than air. However, there may be times when you wish to use air:
- If you need stock right away, the air is only a week, while the sea could take two months
- For smaller shipments, the price between air and sea may not be that much of a difference
- Most importantly, if you are shipping less than $200 cost value (not retail) from China to the United States, you will NOT have to go through customs and all the red tape.
The air freight company will do everything for you and can deliver straight to an Amazon warehouse.
13. If Importing, Set Up Importation Documents
This is where your freight forwarder will come in handy.
Do you wish to learn the intricacies of international trade, rules, and regulations, importing procedures and the complexities of customs fees?
Neither do we.
We just want to sell our product and make money!
A freight forwarder will have a customs broker do all this for you (make sure they have this service before you use them, or has access to one for you).
A few good freight forwarders include:
A customs broker will fill out all the necessary paperwork for you, including importation documents and records, as well as customs fees.
This is very important because there are different categories of fees depending on the type of product.
Your broker will know how to properly categorize your shipment and product type to minimize fees and tariffs.
You will also need an importer number if importing into the United States.
If you are a U.S. citizen, this can be your EIN and SSN.
If you live outside the United States, your customs broker will apply for a number for you, or they may use their number.
Once everything is cleared, you can have your shipment sent to a warehouse, an inspection agency, or to your own home to check everything yourself.
Some of your products will likely have been damaged along the way, so you will not want to send these to Amazon.
The final step is setting up an FBA shipment and arranging to have a local shipper pick up the goods at an Amazon warehouse.
If you have a large shipment, Amazon will more than likely divide it into 2 or more destinations.
Print out and affix the shipping labels to your boxes, and you are good to go!
TIP: Inspect your product in China before it’s shipped out!
We do this at our own warehouse, but there are services out there that will do this for you, such as Asia Inspection (http://www.asiainspection.com/).
14. Work on Your Product Detail Page for High Conversions
Now that you have added your product page, you will want to optimize as best you can for the highest conversions possible.
Remember the main components of your product page:
- Images
- Title
- Bullet points
- Description
- And price
Go through this checklist to optimize your listing:
Image: Does it look clear and detailed, even as a thumbnail?
Do you ONLY show your product and nothing else?
It is better to have no props or any other elements in the image, which could take away from or clutter the product you are trying to sell.
When you take photographs of your product, you are not finished.
A few months or even after a year of selling your product read all the feedback from your customers.
Are there certain features they are consistently asking about?
Perhaps you should re-take some images, angling your product to showcase that feature to make it clearer to the visitor.
Your title: Check your title against your competitors.
Does it stand out? Does it look too plain?
Split test your title by making a small change and tracking the results, such as a higher click-through rate.
Place your brand name first, or swap and place your keywords first.
Use different keywords.
Highlight different features and uses in your title.
Bullet Points: Read your feedback to find common questions or themes.
Look for positive reviews where a customer found something particularly interesting and useful that they didn’t see in other similar products.
Then go back and change a bullet point, highlighting that feature instead.
Remember, while you may think of a certain feature as setting you apart from your competitors, your customers may actually focus on something else about your product!
Description: Update the description if you have changed some of the features in the bullet points, or found some useful feedback from customers.
Look at the white space in your description – heavy, detailed text may turn away some people.
Offer lots of bullet points, short sentences, and subtitles.
Even though the people who read this section are more research-oriented buyers, they will still more than likely skim through your text.
Price: Experiment with your price.
Increase or decrease your price by one dollar at a time, and see if that improves sales or not.
Even if you have fewer sales by selling it for a dollar more, you may make more money overall due to an increase in price.
TIP: You can use BlackBird to Split Test your variations and see what the optimal combinations of Price, Title, Bullet Points, Images and Description are!
15. Write Your Email Follow-up Series to Optimize for Reviews
Reviews are vitally important for Amazon rankings. Not only review a ranking factor, but it is the only social proof for potential buyers to review.
You want to engage your customer through the entire sales process, not only to encourage feedback but to minimize returns and any frustrations.
You want the customer to know that you are supporting them and paying attention to their needs.
They will remember this the next time a friend is wondering about your product or if they are looking for a similar product that you happen to be carrying.
You can automate all this using the Training Inside Amazing Selling Machine.
Create a minimum of 3 emails, which you can customize on a per product level.
These emails will go through Amazon’s secure, encrypted messaging system, so there are a few rules you need to know before starting: no marketing and no inclusion of non-Amazon links.
Let’s go through these 3 emails:
Email #1: Send as soon as your product leaves Amazon’s warehouse.
In this first email, thank them for their purchase and let them know that it has been shipped. Indicate Amazon’s customer service if anything is wrong with shipping or the product itself when it arrives.
Then, to give value to the email, let them know a tip about using it. You can also send an unboxing video or a demonstration of how to use the product, provided the link is hosted on Amazon S3.
Finally, talk about yourself and your business, and how you are ready to answer any questions they may have about the product.
Email #2: Send 7 days after the product leaves Amazon’s warehouse.
Ask the customer if they have received the product, and if not, to contact Amazon’s customer service right away.
Ask them if they’ve checked out the product and if there are any concerns with it.
Offer another tip or two, and highlight a key feature.
Finally, discuss leaving feedback for your product, and a link where they can click to easily leave a review.
BlackBird has several automated variables that will turn into personalized Amazon links once the customer receives the message.
Email #3: Send 16 days after the product leaves Amazon’s warehouse.
In this final email, ask them how they like the product and encourage any questions they may have.
Offer a final tip or two, and discuss again the leaving of feedback, or contact you if they have a concern before leaving feedback.
By sending these emails, you are constantly engaging with your customers, offering solutions to any pain points they may have, and encouraging positive reviews.
This has the added benefit of discouraging returns, as customers will know they can easily reach out to you with any concerns.
16. Plan Your First 30 Days Launch Campaign
When you first launch your product, you will want to plan out a 30-day launch campaign to guarantee success.
These elements include sales, Amazon PPC ads, product reviews, and monitoring.
Early reviews can come from friends and family.
Your goal is to get an initial 15 to 25 reviews as quickly as possible.
Your email follow-up series will also encourage positive reviews.
Have them buy your product at full price to look like a legitimate sale, and reimburse them personally or through services such as Paypal.
Related: Top 10 Best Autoresponders to Automate Your Business
If you have previously launched a product, you should have a list of “VIP” email addresses (past customers).
Email everybody on your list, offering a special, high-discount early bird special.
The goal is not to make money on this, but to encourage reviews, so even if you lose a bit of money on your deeply discounted item, think of it as the cost of successfully launching your new product.
At the same time, turn on your PPC Amazon ads.
The purpose is to give your listing some exposure, as it certainly won’t rank in the top ten, or even on the first page when you just launch your product.
Finally, monitor everything.
Create a spreadsheet with daily or weekly sales and conversion rates.
Keep a close eye on your feedback, and look for your product by searching for your primary keywords to see the position of your product in a search.
17. Turn on Amazon PPC Ads
As part of your launch campaign, turn on automated Amazon PPC (pay-per-click) right away.
At this stage of a new launch, you are NOT looking to make a profit. You are looking for sales only.
Why?
A large part of the Amazon ranking algorithm is something called “sales velocity”.
The more sales in a short period of time (calculated hourly), the higher your ranking in the search results.
Related: ECom Success Academy review
If Amazon sees that you are making sales, they will begin to rank you right away … depending on the competition, this could shoot you to page 2 or even already on page 1 in a short period of time.
After 30 days, you can tweak your ads for profit.
Download the PPC data and find out what keywords your ads have been ranking for.
You can use this search term report to create manual campaigns with your best-converting search terms, as well as have a list of keywords to help optimize your product listing.
18. Continually Optimize Your Keywords on the Page for Ranking
The search term report in your automated Amazon PPC campaigns is one of the best ways to find out what people search for and respond best to.
You can download this report 2 days after you start your campaign.
Using this information, look at the number of impressions, clicks, and sales based on keyword search phrases.
This will give you priceless information on how buyers are searching for products, and if they feel that your title matches what they are looking for.
If you see a lot of clicks but very few sales, take a look at your title to see if customer expectations are not being met. What you may have thought was your best keyword phrase may be something else!
19. Send External Traffic to Your Page to Help Rankings
As mentioned before, a large part of Amazon’s ranking algorithm is sales velocity.
As your BSR decreases (improves, gets closer to 0), you will begin to show up in the top ten for your sub-category.
If your sales are monstrous, you may even show up in the top ten of your main category.
This exposure will further increase your sales velocity!
While Amazon PPC is a very important factor in gaining exposure, there is still a huge world of traffic outside Amazon.
Sending external traffic is possibly an even bigger factor in rankings if that traffic converts to sales.
Simply put, the more sales in a period, the higher your sales velocity, and the higher your rankings.
After all, Amazon is in the business of making money, so if they see lots of sales, they will want to boost you higher to sell even more!
Amazon already rewards the bestsellers by advertising on their behalf.
If your product is selling well, and you visit Google or Facebook, you may see your product being advertised!
Along with Facebook advertising yourself, there are many other ways to gain external traffic:
Blog reviews – Look for your competitor’s products in a high-ranking blog “top ten” product review. Ask the blog owner if they could review your product as well, and send them one to test.
Guest posts – Become an authority in your niche by publishing guest posts on relevant blogs. Send your author credit to your eCom website, where readers can buy your product on Amazon.
Organic listings – Build links to your Amazon product page to rank it at the top of Google for your primary keywords
20. Monitor Your Customer Support Questions & Reviews/Feedback
Finally, offer exceptional customer service.
You are a premium brand, so you need to offer premium support.
This is not only to encourage positive feedback, but it is also a chance for you to connect with real customers who use your products.
Amazon also tracks when you respond to customer messages, and you have a 24-hour window on replies to receive top grades as a seller.
We always try to reply as soon as we receive them.
There is no better way to test your products than by getting feedback from users.
Find out what they like about your product, and what they don’t like.
Using their feedback, you can tweak and constantly improve your product with your supplier on future orders.
If you receive negative feedback, reach out to your customer through the Amazon messaging system and ask if there is anything you can do to turn an unhappy experience into a happy one.
Also, some people will love the product but mistakenly offer only a three-star rating.
You can reach out to them, as they have 60 days to change a review.
If the negative review remains, leave your own helpful and professional response to the negative review as the seller.
Remember, you are building a real business, and you are proud of your brand. Scale with more products, maybe even an entirely new brand, and you will have a million-dollar business in no time!
Final Thoughts and Recommendations
Amazon continues to be one of the very best, and most reliable ways for anyone to build a large online income stream.
It’s not difficult, you just need to follow a proven path, as shown above.
Get Help.
You can do it yourself if you want to, but you can get results MUCH faster by getting help.
Check out the best Amazon using ‘FBA courses
Also, Make Sure you Check the Amazing Selling Machine Review.
Not interested in Amazon FBA? Try Affiliate Marketing.
Here are the best Affiliate Marketing Courses.
Have Any Questions or experience Selling on Amazon? Feel Free to share them in the comments thread below.